Technique Tutorial: Freezer Paper Piecing
There are two methods that I will share here: one is using freezer paper as the actual templates for each shape and cutting them individually. This technique eliminates the need to transfer the sewing lines to the wrong side of the fabric — you simply use the edges of the freezer paper as your sewing guidelines. Once all pieces are stitched together you remove the freezer paper templates. This method is Freezer Paper Templates. The other method is using freezer paper as a foundation pattern, although you don’t stitch through it as you do in ‘ordinary’ paper foundations. This method is Freezer Paper Foundations.
Peeling freezer paper off a completed block is easier than ripping the paper out of the stitches of foundation paper! Although, if you are using it as templates there is quite a bit of preparation with pre-cutting all the shapes required per block. These templates can be re-used for each block. This method takes more prep time because of all the pre-cutting of the freezer paper.
Freezer Paper Templates
1 Transfer the pattern to the non-shiny side of the freezer paper, either by tracing it or printing with an ink jet printer. If you are tracing it, use a ruler to keep straight lines straight.
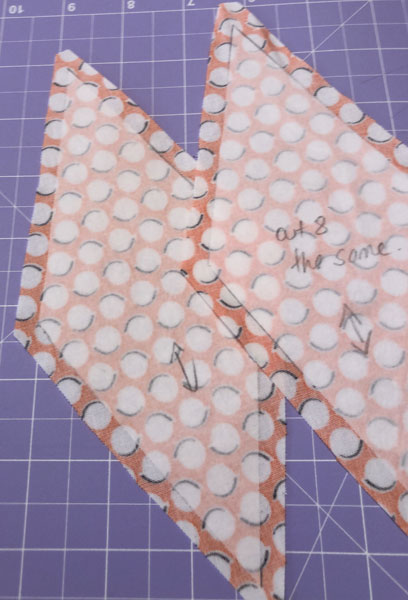
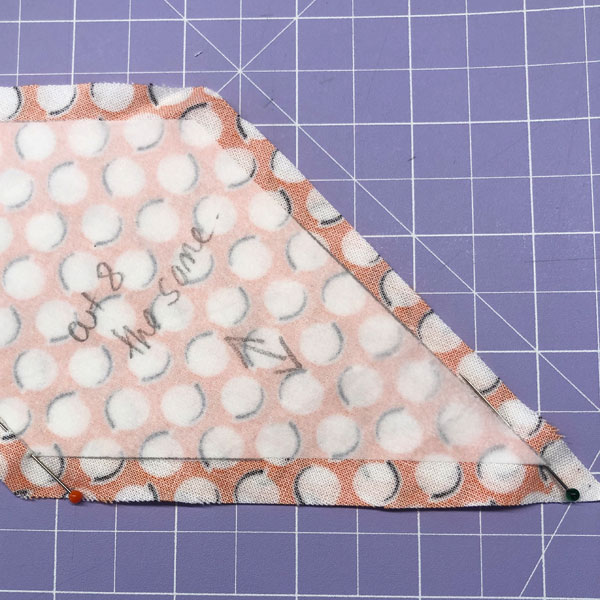
2 Cut each template out on the lines — do not include a seam allowance on the templates. Mark the pieces with the pattern numbers or letters, and transfer marks such as grain lines.
3 Lay each template shiny side down on the wrong side of the fabric. Lay the pieces out with enough space between them to allow for seam allowances on each piece.
4 Cut out each shape with an added ¼in seam allowance all the way around.
5 Lay the pieces in the order they will be sewn to each other, wrong side up, to familiarise yourself with the order.
6 Place the first two adjoining pieces right sides together, carefully pin through the matching ends of each sewing line — which is exactly where the freezer paper ends.
7 Carefully stitch along the edge of the freezer paper. Open out the seams and finger press. Do not remove the freezer paper.
8 Continue sewing the pieces together in the same manner, matching points, stitching along the edge of the paper and pressing seams open.
9 Once all pieces of the block are stitched together, peel it off.
Learn curved english paper piecing with Sue Daley
Freezer Paper Foundations
1 Transfer the pattern to the non-shiny side of the freezer paper.
2 Place a piece of fabric under the pattern, wrong side up, over segment #1, ensuring it extends beyond the traced/printed design.
3 Using a dry hot iron, press the freezer paper so it adheres to the fabric.
4 Carefully peel back the paper and fold it along the line between segment #1 and segment #2. Align a ruler to the fold in the paper. Trim the excess fabric, leaving a ¼in seam extending beyond the folded line.
5 Position the second fabric, right sides and raw edges together, along the trimmed edge. Ensure the fabric will cover all of segment #2.
6 Stitch the seam along the edge of the folded paper, being careful to not stitch on the paper.
7 Open out the second piece of fabric and finger press the seam.
8 Re-press it onto the second fabric. Gently peel back the paper and fold along the next line. As in Step 4, trim the excess fabric beyond a ¼in seam allowance.
9 Position the third piece of fabric, right sides and raw edges together, along this trimmed edge.
10 Fabric shapes are continued to be added in the same manner until all the segments are stitched in place.
11 Lastly, trim around the outside of the design, ensuring there is a ¼in seam. Carefully peel the freezer paper off the pieced design.
Learn how to english paper piece triangles, hexagons, squares
Transferring a pattern to freezer paper
Freezer paper can be run through an ink jet (not laser) printer. Set your printer to handle heavy paper and feed the sheets through one at a time. It has a tendency to curl as it comes off the roll — this can be avoided by cutting sheets the day before and laying them under a heavy book to flatten them, or you can iron it, shiny side down, on a Teflon sheet, or iron it onto a sheet of ordinary copier paper and feed it through the printer, then peel the freezer paper off the copier paper backing. Alternatively, you can buy this packaged as sheets — these are flat.

