Road Test: Rulers by Constantine
Machine quilting is an art in itself, and if you want to try expanding your skill set, you can try quilting rulers specifically designed to work with free-motion quilting. Tracey Browning of Constantine Quilts is a phenomenal long-arm quilter and has designed many quilting rulers. For this Road Test I played with just two rulers from her range.
To construct a quilt, a quilt maker will spend hours, days, weeks, months and even years to make a quilt top. They can utilise a wide variety of techniques, some hand methods, some machine techniques. However, the completed top made in any fashion is not a quilt until it is layered with batting and backing, and the three layers stitched through. Once upon a time the only option was hand quilting. Now we have fabulous machines and a variety of feet that allow us to machine quilt.
Machine quilting is an art in itself, and if you want to try expanding your skillset, you can try quilting rulers specifically designed to work with free-motion quilting. Tracey Browning of Constantine Quilts is a phenomenal longarm quilter and has designed many quilting rulers. For this Road Test I played with just two rulers from her range.

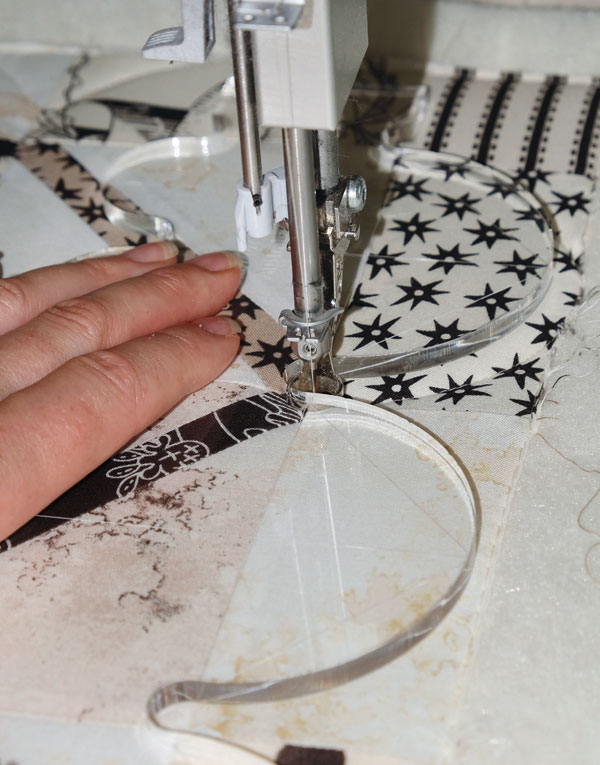
Both rulers are made from ¼in-thick clear acrylic. They can be used on any style of machine: long-arm, sit-down long-arm, or domestic machine. However, you do need a specific style of foot to work with the rulers, one that emulates a hopping foot on a longarm machine. These feet are ½in-wide round rings, on a fixed arm, and are roughly ¼in high. They are a standard accessory with long-arm machines, but you will need to make enquiries to find the correct foot for your domestic sewing machine. For those working on Bernina machines with BSR free-motion feet, the base ring on these feet is too narrow to work with the rulers. You can still use the rulers with the other style of foot, but your stitch regulation is not engaged.
Learn zentangle-inspired free-motion machine quilting!
I am lucky — my husband owns a long-arm machine. I can piece, and he quilts edge-to-edge designs. As I am time-poor, I had not used this machine until I was sent the two rulers — definitely a beginner at this technique. I started with the All-In-One Starter ruler. It is a weird shape, almost triangular, with bites taken out of it. But each odd shape has a purpose. The straight edge allows you stitch in the ditch along piecing, cross hatch with the help of the printed cross on the ruler for placement, or to make multiple parallel lines. The two convex curves can be used to make pumpkin seed shapes, or to quilt continuous curves into pieced sections. It can also be used to guide the quilting foot around curved appliqué shapes, as can the concave curved edge. Lastly, a 1in half circle can be used to create full circles by quilting one half, then moving the ruler to complete the circle. Each shaped edge also has two parallel dotted lines printed ¼in apart on the inside of the ruler. These are used to line up the seams of previous quilting to keep quilting an equal distance apart.
Now having said all that, free-motion quilting is a skill that gets better with practice. The machine did a have a stitch regulator as it was a long-arm. But have you ever tried to free-motion quilt a straight line? The idea of these rulers is that you hold the ruler in place and guide the hopping foot along the edge of the ruler. So, I started by trying stitch in the ditch.
The needle in any of these special quilting feet is ¼in from the edge of the ring of metal. So if you place the ruler ¼in back from the straight seam that you want to stitch in the ditch, it places the needle in the seam. BUT, you have to hold the ruler, press buttons to start and stop quilting. You hold with one hand and guide with the other. My first attempt was barely okay, but I was just getting used to the feel of the machine, the pressure required to hold the ruler, and finding how to quilt in different directions. My second attempt at the same shape was much better as I had some idea of what to expect.
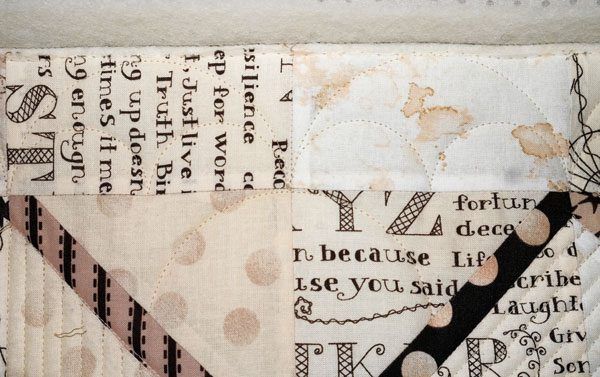
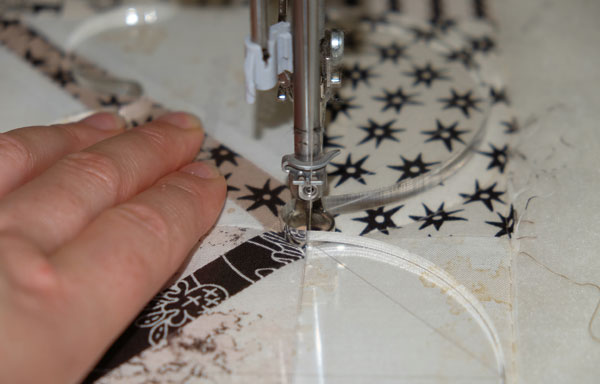
I then tried stitching parallel straight lines. Lots of fun, but I found I was a little awkward in some directions. Again, this is only a practice thing. I was actually happy with my lines by the time I quilted the third area. I did quilt a few pumpkin seeds using the concave edge, more confident on the stitching line towards myself, and a little more erratic working backwards. But they do look like pumpkin seeds!
Create the perfect retro-style bag with this bag pattern by Leanne Barne’s
By now I felt a little more confident with the ruler and I moved on to the Clamshell ruler. This ruler has 2in arcs on one side and 4in arcs on the opposite side. There is a line marked on the ruler for you to line up with a seam. A small inner curve fits the end of the hopping foot, placing the end of the stitching line on the seam at the junction of the clamshells. I placed both large and small clamshells in the border of my project and was by now having fun. I added more clamshells in the next void and then tried some 2in circles using the smaller clamshell side of the ruler.
The first one was excellent, the second unpicked, and the third also excellent. I created each circle in the middle of a pieced area, so I had to quilt the top curve, then park the needle, place the ruler on the bottom of the circle, to then stitch the other half of the shape. Working with the rulers, you need to work out how to best hold the ruler firmly while guiding the machine. I was having a little issue with the rulers moving, but I placed two clear, circle grips on each ruler and found that was all I needed to give me the extra grip that was required. If you wish to quilt clamshells, you will need a ruler in the correct size for your piecing: a 2in or 4in clamshell shape will only fit neatly into piecing using the same maths.

When working on the domestic machine, the technique is slightly different. The basic concept is the same, only now you have to guide the ruler and quilt around the stationary ruler foot. On a long-arm you move the machine, one hand on the ruler, one guiding the machine. A large extension table is necessary to give the ruler a stable base. I use both hands to hold the ruler and then guide the ruler along the ruler foot. The thickness of the ruler can be an issue at the back of the foot, so work only from the front and sides and you will have no issues.
Free-motion quilting of any type is a skill that gets better with practice. These rulers expand the possibilities and create more consistent shapes. Tracey has YouTube videos showing how to use the Clamshell ruler, and other quilting skills. You can always practise on community quilts to raise your skill level — a win for everyone! You can contact Tracey at Constantine Quilts, details below. She has many instructional books and videos on quilting available, as well as a multitude of quilting rulers.
For more information:
https://constantinequilts.com.au
https://www.facebook.com/constantinequilts
https://instagram.com/conquilts

