Road Test: The Clammy 6in by Latifah Saafir Studios
Driven by Michelle Marvig
I started making patchwork quilts 27 years ago. Fabrics, quilt designs, tools and expectations have changed so much since I first picked up a rotary cutter. I now find that I teach beginners techniques and quilts that I once thought of as advanced, as the tools available today make construction easier. American quilter Latifah Saafir has a new ruler design for making curved blocks, in particular the Clamshell.
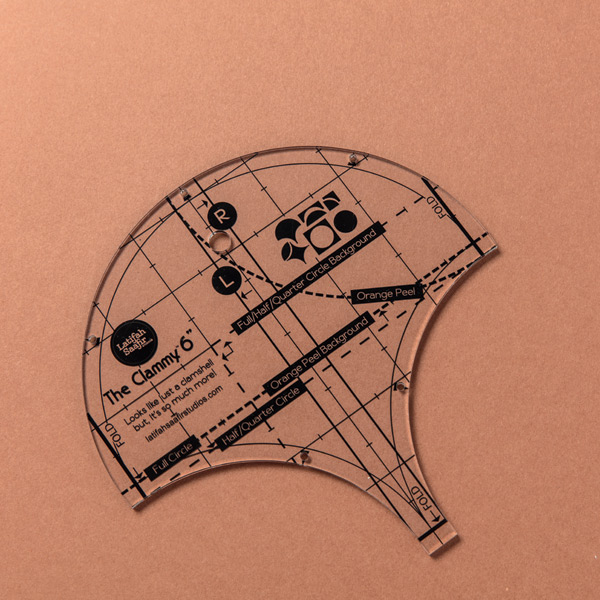
The new ruler is known as ‘The Clammy™’. It comes in three different sizes — The Clammy™ 6in, 8in or 12in. While the sizes of the squares required to cut the shapes are different from one size to the next, possible shapes and cutting techniques remain the same. Each ruler is accompanied by printed instructions for cutting the nine different shapes with the ruler. The most obvious shape is a clamshell, which is the shape of the whole ruler. It is easy to see how to use the ruler for this shape; simply place it on your fabric and cut around the entire shape. Following the included instructions, you can also cut a circle background and the internal circle, half circle backgrounds and half circles, quarter circle backgrounds and quarter circles, and finally Orange Peel backgrounds and Orange Peel ovals to match. There are many possibilities with this ruler.

Create Jane Davidson’s Colourful Clams Quilt

For the Road Test, I decided to see if I could make a cushion front. I chose to use the clamshell as my main shape, as I had not made one before. I cut individual squares from a variety of orange fabrics and fussy cut one aqua for extra effect. The clear ruler made it easy to position my fox in the centre of my clamshell. To complete the design with a straight edge, I needed to cut half-circle backgrounds for the top of the clamshells and half and quarter circles for the bottom row. To tidy up the edges I used the Left and Right markings for the quarter circle to cut half blocks in both left and right directions. I could have cut whole clamshells, then trimmed away the excess, but the markings on the ruler allowed me to cut a neat, finished shape. This shape is not listed in the instructions, so is actually the 10th shape possible from the one ruler. Once the shapes are cut for any project using this ruler, markings need to be placed on the wrong side using the holes in the ruler. This helps to line up the concave and convex curved edges and keep the distance even along the seam.

Make the Shelly and Percy Doll and Softie for your little ones!
To start piecing the clamshells, you start on the top row, using the half-circle backgrounds. I pressed the straight joining seams open, as this seam ends up between the points of the clamshells in the next row. The result is three open arches, into which you can insert individual clamshells. I pinned on the marks, and in between, and sewed with the larger background piece uppermost so that I could watch for pleats. It is not fast work, as you cannot chain piece; each clamshell is an individual seam. I just kept working in rows down the cushion and it came together very nicely. I have worked with curves before, so the smaller 6in version of the ruler was not a challenge for me. However, if you have not done too much curved piecing, I suggest trying the 8in or 12in for your first attempt. The larger the curve, the easier it is to sew.

As it is possible to cut 10 different shapes with The Clammy™, imagine how many different quilts you could make? You can cut many of the shapes from squares, Charm Packs, Layer Cakes and other precut fabrics that are suitable for using with this ruler. You could also strip piece fabrics before you cut it down further into squares. Or, make big Nine Patches to cut some of the shapes from or create a low-volume background with clamshells and appliqué — so many ideas, so little time!
You can currently find two patterns to use with the ruler at latifahsaafirstudios.com. She has s video tutorial for making the Glam Clams quilt on YouTube; if you have not worked with curves before you will find this useful. Happy stitching!

