Quilting with Rulers
There is a buzz word at any time, in any industry, and the quilting world is no exception. Right now, that is ruler quilting.
Ruler quilting, however, is not new, long arm quilters have been using rulers on their quilting frames for a long time. What is different now is that, with the introduction of the ruler foot for domestic machines, more people can use rulers in their quilting than ever before.
I have been fortunate enough to work with Leonie and Bill West from Westalee Design, an Australian company, for many years. They were the first to develop a foot that fits onto many domestic sewing machines today. Along with that first foot, they also designed literally hundreds of templates to create limitless patterns for machine quilting.
Moving on a few years, they have recently sold their business to a large American company. So, as always, I will be giving general advice that is not specific to any particular brand.
So, what is ruler quilting?
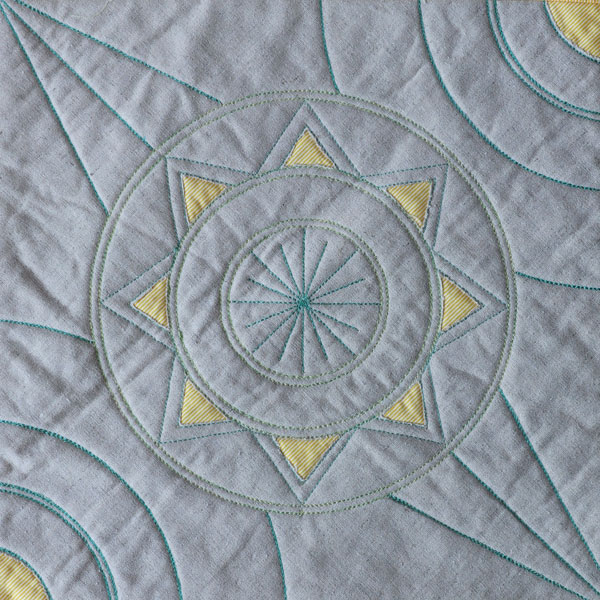
Ruler quilting is essentially freemotion quilting using a foot with a raised edge that runs alongside the edge of a template. The foot does not engage with the feed dogs – your hands become your stitch regulator. In other words, if you don’t move your hands all that is created is a pile of stitches in one place.
The designs you create are not limited to those that you can freemotion ‘draw’ with thread. Any template has sides that you can pretty much guarantee your quilting will mimic the shape. That said, it does take a bit of practise before you perfect results are achieved. But as I always say, perfect is overrated!
So, what are the benefits of ruler quilting?
- As I touched on before, it is all about the accuracy. Designs that you create with rulers can be very accurate and detailed.
- You might feel that you are lacking imagination, well rulers help here because they show you the shape to use and you don’t need to design it yourself.
- In my opinion ruler quilting is easier than freemotion quilting as there is something to guide your stitching and design.
- Following a drawn line, or stencil line can be challenging, resulting in uneven stitching as you concentrate on that line too much. With rulers. marking is minimal and there is usually no line to follow, only the edge of the template. Believe me it is a lot easier.
What type of rulers and ruler feet do I need for ruler quilting?
There are hundreds of different templates and rulers on the market, so how do you know if they will be suitable for quilting with rulers on your domestic sewing machine? I will go through the main types;
First you need the right foot for your machine; your machine will be either low shank, high shank or a longarm frame/sit down longarm machine.
Measure your shank distance; To find out which shank height your machine is, remove all the feet and shank attachments. Lower the foot and measure from the centre of the screw hole to the base of the machine.
- Low shank; this distance is ½”. Most domestic machines are low shank and you will need a low shank ruler foot and templates
- High shank; the distance measured is 1”. Some high-end domestic machines and embroidery machines are high shank machines. You will need to use a high shank foot but can usually use low or high shank templates.
- Longarm; long arm machines have the foot attached from their manufacturer and most long arm, midarm and sit-down quilting machines use a hopping foot and 6mm or ¼” templates.
- Now you need to choose low shank and high shank quilting templates and rulers; there are three thickness of ruler;
- 3mm (1/8in) low shank templates; most domestic machines can use low shank templates, the exception being high shank machines where the foot hops during quilting.
- 5mm High shank templates; these are suitable for those domestic sewing machines that use a high shank foot. High shank machines will always need to use a high shank foot but can usually use low or high shank templates, unless the foot hops during quilting. In this case only high shank templates should be used.
- 6mm (1/4in) longarm templates; these are designed for those frame quilting machines with feet that hop. The height of the template ensures the foot cannot hop on it during the quilting process. They cannot be used on domestic sewing machines as there is not enough space behind the shank and foot on the machine.
- Cutting and piecing rulers; these are designed to aid in measuring and cutting fabric with rotary cutters and are not suitable for quilting as they are not usually the right thickness and are nearly always too big to fit under the sewing machine harp anyway. Keep these for your patchwork.
- Templates from many different manufacturers; there are many different companies making templates for quilting today, some better than others. Always make sure that you are using templates of the right thickness for your machine or you may run into difficulties. Remember 6mm 1/4in) templates will not work on an ordinary low shank sewing machine.

How do I get set up for ruler quilting?
So, you have figured out the type of rulers and the foot that are needed for your machine. What else do you need to set yourself up for great ruler quilting?
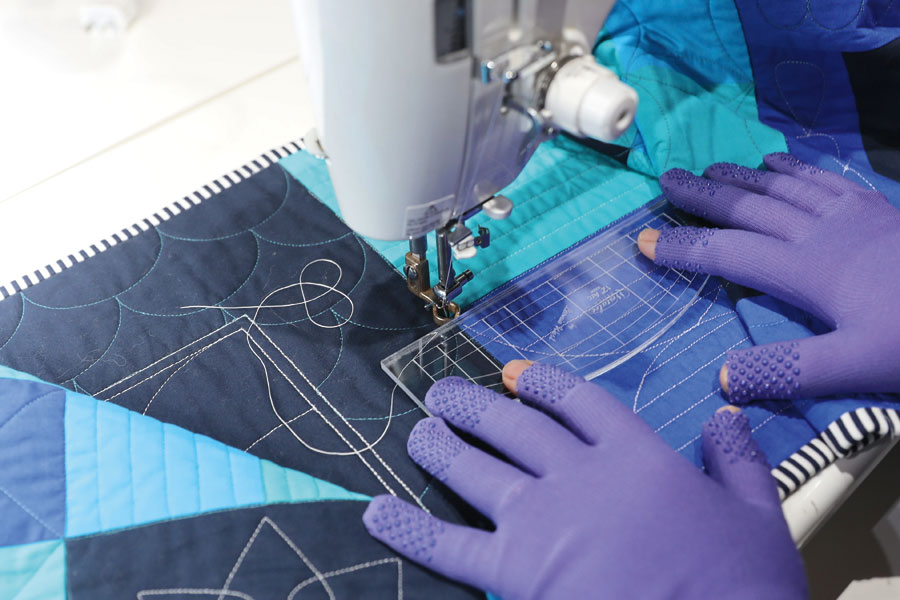
- Extension table for your sewing machine; this is essential as it provides the flat surface for your quilt and templates to glide over. If there is a slope on the table, either in front or behind the needle, the templates will rock, and you will never get good results. If a perspex extension table didn’t come with your machine when you bought it, you can often purchase them from the manufacturer or a third party. Make sure it is made exactly for your machine, with the front toolbox removed. If you have basic carpentry skills, an extension table can be made from MDF. If is made of MDF, do not varnish it, or the quilt sandwich will not slide well. The most important thing is a flat, smooth surface to quilt on.
- Some form of slippery mat; there are a few manufacturers who make the slippery mats that cling to the surface of your machine and extension table. I use a Sew Slip mat but there are others out there too. These are designed so the quilt sandwich glides across the surface and does not encounter friction. The mat needn’t be enormous, as it is more about where your hands are going to be working with the quilt sandwich.
- Quilting gloves; I always quilt with tight-fitting quilting gloves with lots of grip. They really help with control of the quilt sandwich, especially if it is large. Tight gloves mean that the fabric of the gloves and the quilt sandwich move at the same time. If they are too loose, the gloves move before the quilt and slip, resulting in inaccurate work.
- Gripper for the back of the templates; you do not want the templates to slip on the fabric and usually some form of grip is required to stop this. Again, there are a few different options out there and the templates you choose may include this or it may be an additional purchase. If you are finding that the templates are moving around on the quilt surface, maybe check to see that the gripper is doing its job properly.
- Needles; it is important that needles and threads are well matched. Universal needles are not a good choice for quilting. Use good quality top stich or quilting needles with the appropriate size for the thread being used. If you are finding that you are having issues with your stitching, then try the Superior Top Stitch needles or Janome Purple Tip needles. They go a long way to curing problems with stitches.
- Thread; big topic this one! To summarise, I would suggest that you use thread designed for quilting, rather than construction. Thread can be made of cotton or polyester. Polyester threads can be very good quality these days and create less lint. Try lots of threads and see what suits your machine and the style of the quilt you are creating. I almost always use the same thread in the bobbin. This results in much neater stitches which do not highlight tension issues. If you are finding that a certain thread shreds or breaks, check your needle/thread combination and make sure the ruler foot is floating just above the quilt sandwich, before you stop using it.
Do’s and don’ts of ruler quilting
Everything is gathered, your machine is set up. That’s great, now for some do’s and don’ts.
Don’t;
- beat yourself up if your work isn’t up to your high standard, or the standard that your longarm quilter has been doing for you. They have trained a long time to create that result,
- use poor quality needles and threads and expect great results,
- use templates of the wrong thickness for your machine. At best, they will be very difficult to quilt with and at worse, you could damage your machine.
Do;
- use the resources available to you;
- Hands-on classes
- YouTube videos
- Videos and instructions from the ruler manufacturers
- Facebook groups that share information and ideas. I run a Facebook group called ‘A Quilting Education’ which showcases students’ work and ideas. There are many other groups out there to join,
- use the right foot and templates for your machine,
- enjoy yourself! It may not be perfect at first, but with practise it will get better. Give yourself time,
- keep to simple designs at first. Start with a straight ruler and see what you can do with it,
- start on small blocks and build up to big quilts,
- check the tension on the front and the back of the work regularly; unpicking takes a lot longer than quilting,
- pull the bobbin thread to the top of the work when starting and finishing so that threads are not tangled on the back of the work,
- change thread colours often, your work will be better for it,
- try quilting with feed dogs up or down. No rules here, some machines prefer certain ways,
- Wind good quality, tight, even bobbins. A poorly wound bobbin will cause lots of problems.
- make sure the quilting surface is flat with no lumps or bumps,
- make sure you have a tidy space around the machine so that the quilt doesn’t catch or drag.
So, is it hard to quilt with rulers on a domestic sewing machine?
It must sound like a lot to think about, but go through everything step-by-step and ruler quilting could be one of the most rewarding things you can do with your craft. Imagine, great designs, accurate stitching lines and quilts that you have completed from start to finish. What a satisfying feeling. If at first it seems too hard, don’t give up, practise as much as you can, take classes, use internet resources and keep that first attempt to look back on. It will never be that hard again.
In the next article I will be discussing how to choose different rulers and templates for your quilting style. There is a lot of choice out there and I plan to help you narrow that choice to templates that really suit you.
Till then,
Happy quilting,
Anita

