Block Masterclass Series: Dresden Plate
The Dresden Plate owes its name to the German city of Dresden, where porcelain plates decorated with elaborate flowers, fruits and foliage designs were produced. These plates became the inspiration for the Dresden Plate quilt block. During the 1920s and ‘30s, these blocks were some of the most popular designs.
The Dresden Plate pattern combines sewing and appliqué skills. Typically, the plate is made of 16 to 20 blades, wedges or petals in addition to the centre circle. The blades can be thick or thin, short or long, rounded or pointy and more! The blades are stitched together along the straight edges to form a circle. Once the circle is complete, it can either be appliquéd onto a background square and set into a traditional side-by-side arrangement with sashing, or placed more randomly over a wholecloth background.
Sewing the Dresden Plate block
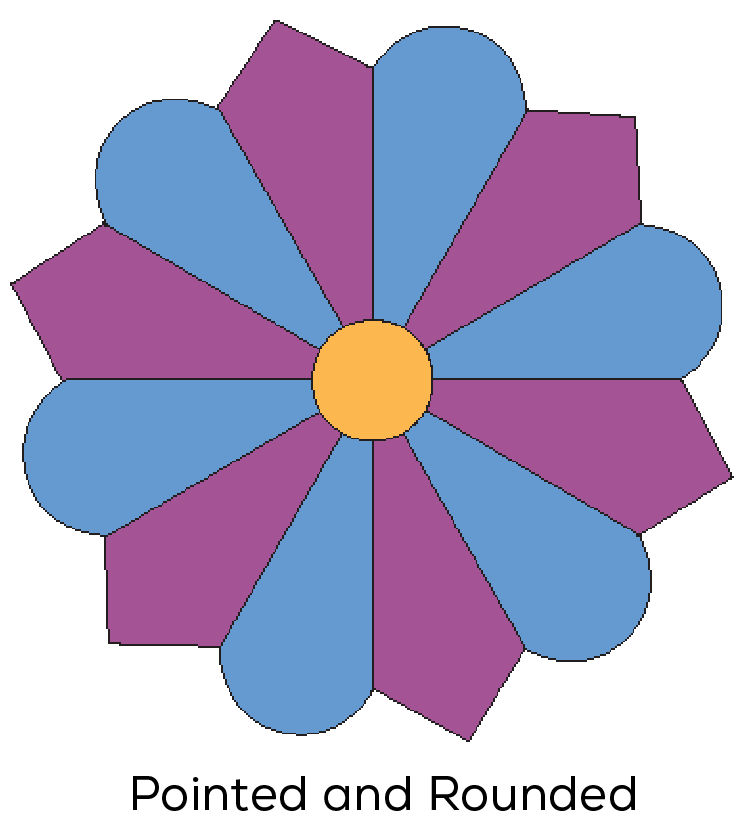
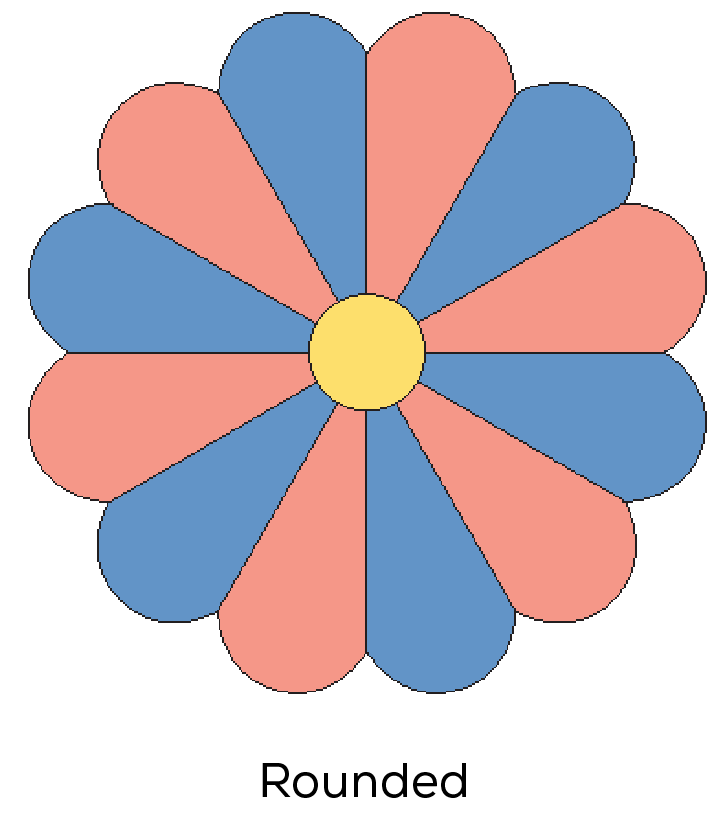
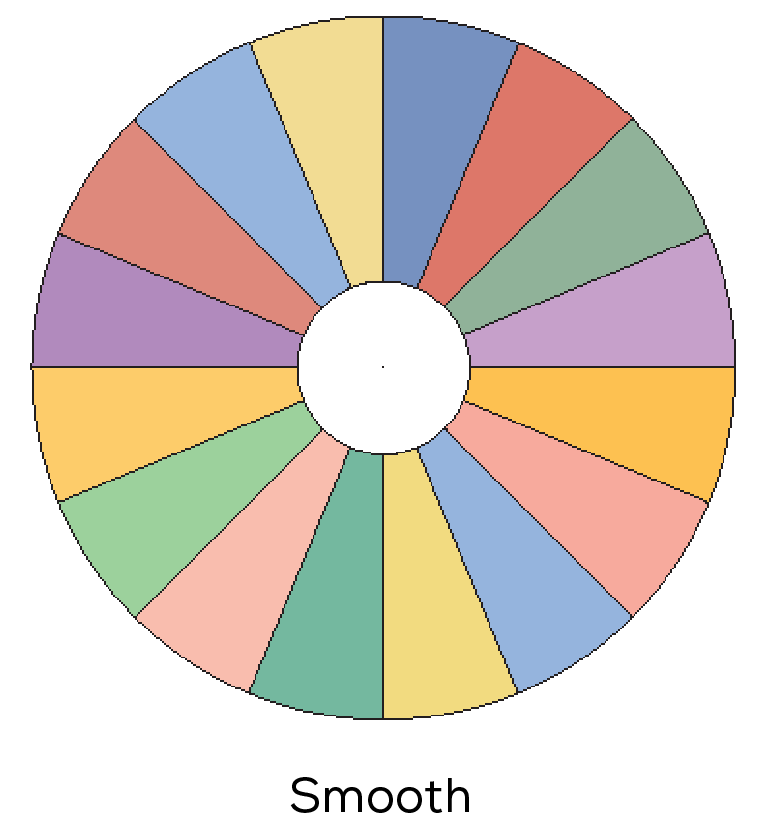
There are three main components to a Dresden Plate: a circle, blades (or petals or wedges) and background fabric. The blades have straight edges that are sewn together into a circle and then appliquéd onto a background. Once joined, they radiate out from the centre. After that step is complete, the circle is appliquéd directly on top of the petals. This is the traditional layout of the Dresden Plate block, and there are many variations. The amount of blades and the end of the blade shape are the most common variations. Mostly you will see the ends of the blades finished into a point or a curve. Sometimes the edges of the blade form a smooth circle when sewn together.
Making templates
You can draft your own templates or trace them from a purchased pattern or one downloaded from the internet. Then trace them onto template plastic or cardboard. Trace around this shape onto the back of your fabric and cut each one out with a ¼in seam allowance. English paper piecing is a very popular and accurate option these days. The centre can also be done over papers and stitched in place. There is a ruler and/or laser-cut template on the market for just about any block these days, and Dresden Plates are no exception. Laser-cut templates are accurate — simply draw around them on the wrong side of fabric and cut out the fabric pieces. Using cutting machines such as AccuQuilt and ScanNCut is another accurate option. The shape of the outer edge of the Dresden Plate is decided at the stage when you purchase or make your templates or papers. Rulers have been around a long time, pre-dating laser-cut templates and cutting machines. There are many on the market, offering a huge range of shapes and lengths. It is simply a matter of following the manufacturer’s instructions to cut blades across a strip of fabric, or from smaller pieces. Another technique that pre-dates pre-cut templates is to use freezer paper — see instructions on page 80.
Pointed blades
If your choice is to have pointed blades, and you have straight-edge blades cut, then it is at this stage, prior to stitching them together, that you make the next step. On the wrong side of a fabric blade, rule a line parallel to the wider end about 1in down. See Diagram 1. Fold the blades in half lengthwise, right sides together, and finger press along the fold. Stitch across the drawn line. See diagram 2. Draw a line on each blade at the same distance from the wider end and sew each one in the same way. Turn them right-side out and push the pointy end out and finger press.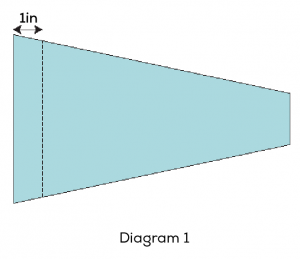

Stitching the blades together
Whether you draft the pattern yourself, fold freezer paper as described below, use acrylic templates and rulers or ready-made papers, this block can be challenging to make. If the circumference of the pieced blades is not absolutely correct, the circle will not lie flat upon the background fabric when it comes time to appliqué it in place. Join the blades together into sets of two, then join two sets of two into four, and then two sets of four into eight. Make two halves in this manner, then sew the two sets of eight together to form a circle of 16 blades.
Stitching the blades to the background
You will need to determine the correct placement for the plates on the background. If you are stitching onto background blocks this is simple: fold the background in half and half again and finger press the centre for about 2in in each direction. Open out the fabric. Align the seams of the plate horizontally and vertically with the finger-pressed centre of the background and pin it in place. Whether you choose to hand or machine appliqué, it is imperative to pin the plate securely in place first. You can also use fabric glue or double-sided paper-backed adhesive to baste the plate in place. If stitching by hand, match the thread colour to that of the plate being applied, not the background colour.
If you are appliquéing by machine you may wish to use a satin stitch or blanket stitch. In this case you may choose to use a colour thread that adds a contrast.
After you have machine or hand appliqué the Dresden Plates to the background fabric. Trace the centre circle onto the back of the relevant fabric and cut it out with a ¼in seam. This can be attached in whatever method you wish. You may want to remove the background fabric from behind each plate or you can leave it in place for an extra layer.
Freezer paper templates
Before pre-cut papers became widely available, a handy method was to use freezer paper. In fact, you still can use this method but store-bought pre-cut papers are much more accurate!
1 Using a square of freezer paper that is slightly larger than the desired plate size, fold the square in half and half again, creasing it very crisply. You now have four sections. Then fold it diagonally to create eighths and then fold in half again to make sixteenths. Crease really well. You will have 16 wedges around a centre point.
2 With the paper still folded, using a pencil and a compass (or a round object of a suitable size) mark an arc across the shape at 1in from the point and another arc at 5½ inches from the point. This will make a 12in plate, with a centre circle with a diameter of 3in, and rounded edges on the wedges. These measurements can vary according to how big you want your centre and how big you want your plate.
3 Very carefully cut on these drawn marks, making sure to hold the freezer paper firmly as you cut or it will shift (you can pin it).
4 Open out the freezer paper ‘plate’ and number the 16 wedges. Cut them apart very carefully on the creases to create your paper templates.
5 Iron the templates to the back of your fabrics. The pieces must go back together in the order that is marked on the templates to ensure accuracy.
6 Using either thread or glue, baste the seam allowances to the back.
7 Whip-stitch the pieces together using the English paper piecing method. The outer edges will be turned ready for appliquéing the completed plate to the background. Remove the papers.
8 Apply the ‘plate’ to a background either by hand or machine.
9 Use the piece of freezer paper that was cut away from the centre of the wedges as a guide for the size to cut your centre circle, making the template at least ¼in larger than where the plates meet at the centre. Pin and appliqué the centre in place.
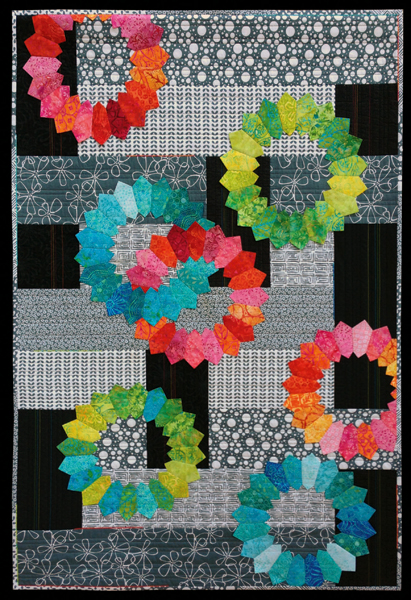
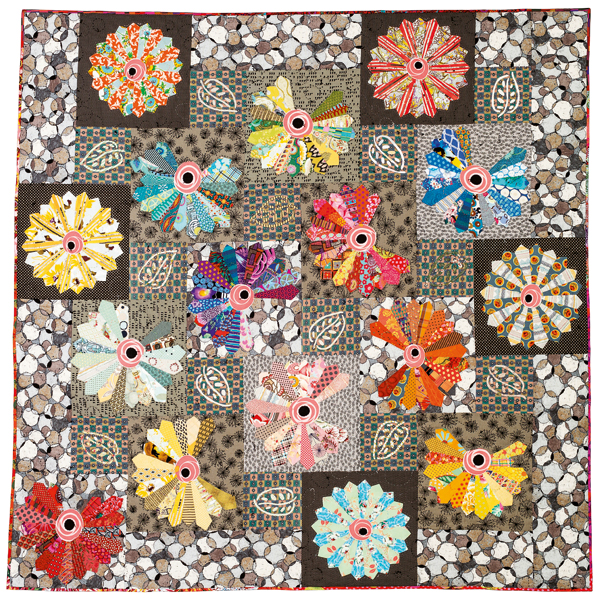
Dresden Plate variations

Gallery
There are various settings for Dresden Plates. Set them on blocks with sashing, place them randomly, set them with other blocks, make smaller and larger plates — these are just a few ideas.
Each ring in this quilt is about 18in (46cm) in diameter and the construction is quite different from the traditional method.
Susan created points on both the outer edge of the blades and the inner edge using her Prairie Pointer Tool to turn the points. To build her rings (plates), she traces the foundation template onto heavily starched white fabric, then uses a sew-and-flip technique to stitch each double-pointed wedge onto the ring to create beautifully round rings that lie flat.
Before placing the completed rings on the quilt top, she pieced the background, made a quilt sandwich and then quilted it. She then placed the rings and stitched them in place. To do this, she used a fine thread in the sewing machine and stitched in the ditch between two blades, lifting the point and stitching under it to the next ditch, and repeating. If the quilt is to be washed, Susan suggests stitching the points in place, but she likes leaving them unstitched for wall quilts.
Make it modern by combining traditional Dresden Plate blocks, reverse appliqué and fussy cutting to create this unique quilt. Pattern available here

You can put a playful spin on the traditional Dresden Plate by surrounding the full plate blocks with daisies made from partial blocks, an appliquéd border and embroidered bees. Pattern available here

