Monica Poole’s Top 10 Bag Making Tips!
Why do we love to make handbags so much? Well, a handbag doesn’t have to fit anyone, they are the perfect personalised gift, they’re quick to make and a great way to build on your sewing skills. In a world of mass production, a handmade bag is a great way to express your own creativity and personal style.
I focus on designing fun, fashionable handbags that everyone can make, from a beginner to an advanced sewist. There are many ways to sew something, but I always choose the simplest and most straight-forward way because we all sew for fun and I want everyone to enjoy their experience when working with my patterns.
Drawing on my industry experience and many years of designing and teaching bag making, these are my top 10 tips:
- Make a good fabric choice
I design my bag patterns to suit medium-weight patchwork and quilting fabrics as there are so many great prints to choose from, but if you want to make a bag that is more durable, choose a fabric that has a bit more body. On a scale of 1 to 10, a patchwork fabric would be a 5 so try to choose a 6 or a 7. Use natural fibres like a medium-weight cotton canvas, linen and cotton blends, a home dec weight or denim. Avoid using slippery fabrics, fabrics with an open weave and that fray a lot and thick heavy fabrics, because there are times when you will have multiple layers of fabric and interfacing in the one seam, which your sewing machine won’t like!
Make this Gothic Revival Bag with Mariko Ikeda’s pattern
- Use the right interfacing
Even though you can’t see the interfacing, it will make or break your bag. If you want to make a floppy bag, use a floppy interfacing such as medium-weight iron-on Pellon. If you want to make a bag that stands up and holds its shape, then use a foam interfacing. Foam interfacing was introduced to the craft market only a few years ago and it’s been a game changer for bag making! There are different brands that are all similar — a 5mm thickness of foam with a textile layer adhered to either side. There are sew-in and fusible varieties for different bag-making techniques. When working with a pattern, use what the pattern recommends. Read the Uptown Tote instructions to see how I work with a sew-in foam interfacing.
- Prewash your fabrics and trims first
If you’re making a fabric bag, you may want to wash it in the future, so pre-wash your fabrics and trims to remove any shrinkage. Do not pre-wash your interfacing. Your bag can then be hand-washed and spun in the washing machine and hung out to dry on a breezy sunny day.
- Invest in good tools
Use a rotary cutter, ruler and cutting mat for cutting out straps, medium-size scissors for cutting out your pattern pieces and smaller, sharp-pointed scissors for nicking in and clipping seam allowances.
- A great project starts with great cutting
Cut out your pattern pieces accurately to begin with. Make sure your pieces marked with FOLD are pinned exactly on the FOLD.
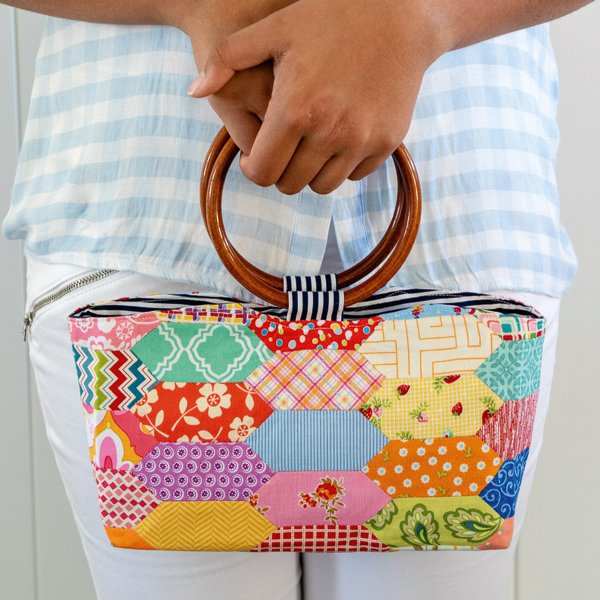
Create this fun scrappy collage bag!
- Cut on the grain line
Cut your pattern pieces to the correct grain line as indicated on the pattern piece. Don’t be tempted to turn your pattern piece in the other direction to save fabric. The pattern designer has put a grain line on the pattern so that the grain line will run parallel with the selvedge for a reason — see About Grain Lines.
- Read through all of the instructions first
Yes, I know that this is boring and you’re excited to get started, but knowing what is ahead will help make each step more understandable and easier to follow.
- Marking position points and notches
To mark position points, simply poke a small hole in your pattern with a sharp tool such as a tailor’s awl or sharp-pointed scissors, then mark through the hole of the pattern onto the fabric with a fabric marker. To mark notches, make tiny snips in the edge of your fabric that are only 3mm (1/8in) deep with the tip of your scissors. (NO DEEPER)
- Correct seam allowance
This is one of the most important tips. Consistently taking the correct seam allowance will make the pieces fit together neatly.
- Zippers
Use an open-ended jacket zipper that is a bit longer than required. It’s thicker than a dress zipper, it looks great and is more durable in a bag. (If possible, avoid the chunky zippers as they can be difficult to sew through.) A bag starts out flat so you can sew the zipper into opposite sides of it, then separate completely so that you can go about making the bag without the restriction of it being joined together at one end. If the open-end zipper isn’t trimmed and sewn into a seam, then finish it off with a zipper tab. You can see an example of this tip in the Uptown Tote. Zippers come in basic colours, so try to choose your fabric and zipper at the same time.
Sugar and spice and all things nice is this hand bag pattern from Christine Welsh
About grain lines
The across ways grain (weft) runs across the fabric from selvedge to selvedge. If you were to pull on the fabric in this direction, you will notice that it has a slight amount of give or stretch. The down ways grain (warp) runs down the fabric, parallel to the selvedge. If you were to pull on the fabric in this direction, you will notice that it is quite solid and has no stretch or give at all. The bias grain runs on a 45-degree angle to the weft and warp and has stretch. This is why piping and bias are cut on the bias grain as the stretch enables the fabric to be sewn around curves.
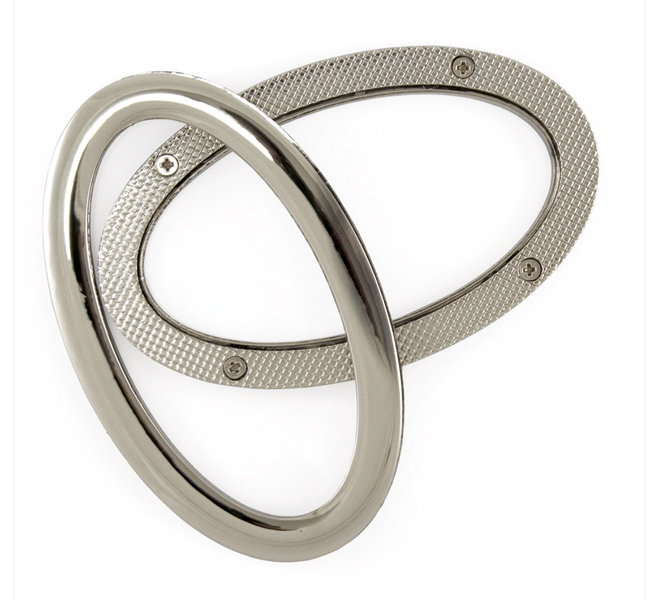
Bag hardware
There are plenty of options out there — shop around. Voodoo Rabbit and QH Textiles (studio Mio) both offer a wide range of clasps, handles, magnetic closures and more.